Your iPad can do everything a paper bullet journal does — minus the monthly redraw. Here’s how to set it up so it actually sticks.
There’s a reason the bullet journal method has lasted over a decade. It works.
Not because of the elaborate spreads you see on Instagram. Not because of the washi tape or the Tombow brush pens. It works because at its core, it’s just a system for writing things down — tasks, events, notes — in a way that lets you review and move them forward. Simple. Flexible. Personal.
But there’s a reason a lot of people start bullet journaling and then quietly stop within a few weeks.
The monthly setup takes forever. You redraw the same layouts every thirty days. You forget your notebook at home. You run out of pages in the wrong section. And the moment you skip a few days, the guilt spiral begins — blank pages staring at you like a stack of missed deadlines.
This is where the iPad enters.
Not as a replacement for the bullet journal method. As a better home for it.
What Makes the Bullet Journal Method Work
Before we talk tools, let’s talk principles — because this is where most “digital BuJo” guides go wrong. They jump straight to app recommendations without understanding what actually matters.
Ryder Carroll’s original bullet journal system is built on a few key ideas:
Rapid logging. You write short, symbolic entries — a dot for tasks, a circle for events, a dash for notes. It’s fast. No formatting decisions, no categories, no friction. Just capture and move on.
Migration. At the end of each day or month, you review unfinished tasks and decide: move them forward, schedule them, or cross them out. This forced review is where the real value lives. It’s not just a to-do list — it’s a filter for what actually matters.
Collections. Themed pages for anything you want to track — books to read, project ideas, gift lists, habit trackers. They live alongside your daily logs, not in a separate app.
Flexibility. There’s no “right” layout. The system bends to your life, not the other way around.
Any digital solution that claims to replace a bullet journal needs to support all four of these. Most don’t.
The Problem with Most “Digital Bullet Journal” Approaches
Here’s what typically happens when people try to go digital with their BuJo:
The GoodNotes / Notability route. You download a note-taking app, buy or create a PDF template, and start filling in pages. It looks great on day one. By week three, you’re spending more time switching between linked pages and adjusting layouts than you are actually planning. And your calendar? It’s in a completely different app — so you’re copying events by hand, which is exactly the friction bullet journaling was supposed to eliminate.
The pre-made PDF planner route. Etsy is flooded with hyperlinked PDF planners that mimic bullet journal layouts. But these are essentially frozen structures — you can’t add pages where you need them, you can’t create a new collection on the fly, and you definitely can’t see your real calendar events alongside your handwritten notes. You’re decorating a PDF, not running a system.
The “bullet journal app” route. Apps like Elisi or Structured digitize the concept of bullet journaling but strip away the handwriting. You’re typing into fields, tapping checkboxes, selecting from dropdown menus. It’s functional, sure — but something important is lost. The act of writing by hand isn’t nostalgia. Research consistently shows that handwriting engages cognitive processes — memory encoding, intentional thinking, spatial reasoning — that typing doesn’t. When you write a task by hand, you’ve already begun to process it.
Each of these approaches captures part of what makes bullet journaling work. None of them capture all of it.
What a Real Digital Bullet Journal Needs
If you want your iPad to genuinely function as a bullet journal, you need four things:
1. Handwriting with Apple Pencil. Non-negotiable. The whole point of bullet journaling is writing by hand. If the app doesn’t support Apple Pencil natively — with good palm rejection, pressure sensitivity, and low latency — it’s a note-taking app, not a journal.
2. A calendar you don’t have to maintain separately. The monthly log in a paper bullet journal is useful, but it’s also the biggest source of redundancy. You already have a digital calendar full of meetings, appointments, and deadlines. Copying those into your journal by hand is busywork. The ideal setup shows your real calendar events right alongside your handwritten plans — automatically, without you doing anything.
3. Structure without rigidity. You need daily pages, weekly views, and monthly overviews. But you also need to be able to scribble in the margins, add stickers, sketch a quick diagram, or create a freeform collection page whenever you want. The system should provide scaffolding, not a cage.
4. Zero template setup. One of the most underrated qualities of a paper bullet journal is that you just open it and start writing. No importing files, no linking pages, no configuring layouts. The digital equivalent should feel the same — open the app, and today’s page is ready.
How to Set Up Your iPad Bullet Journal
Here’s a practical setup that keeps the soul of the bullet journal method intact while eliminating the parts that make people quit.
Your Daily Log
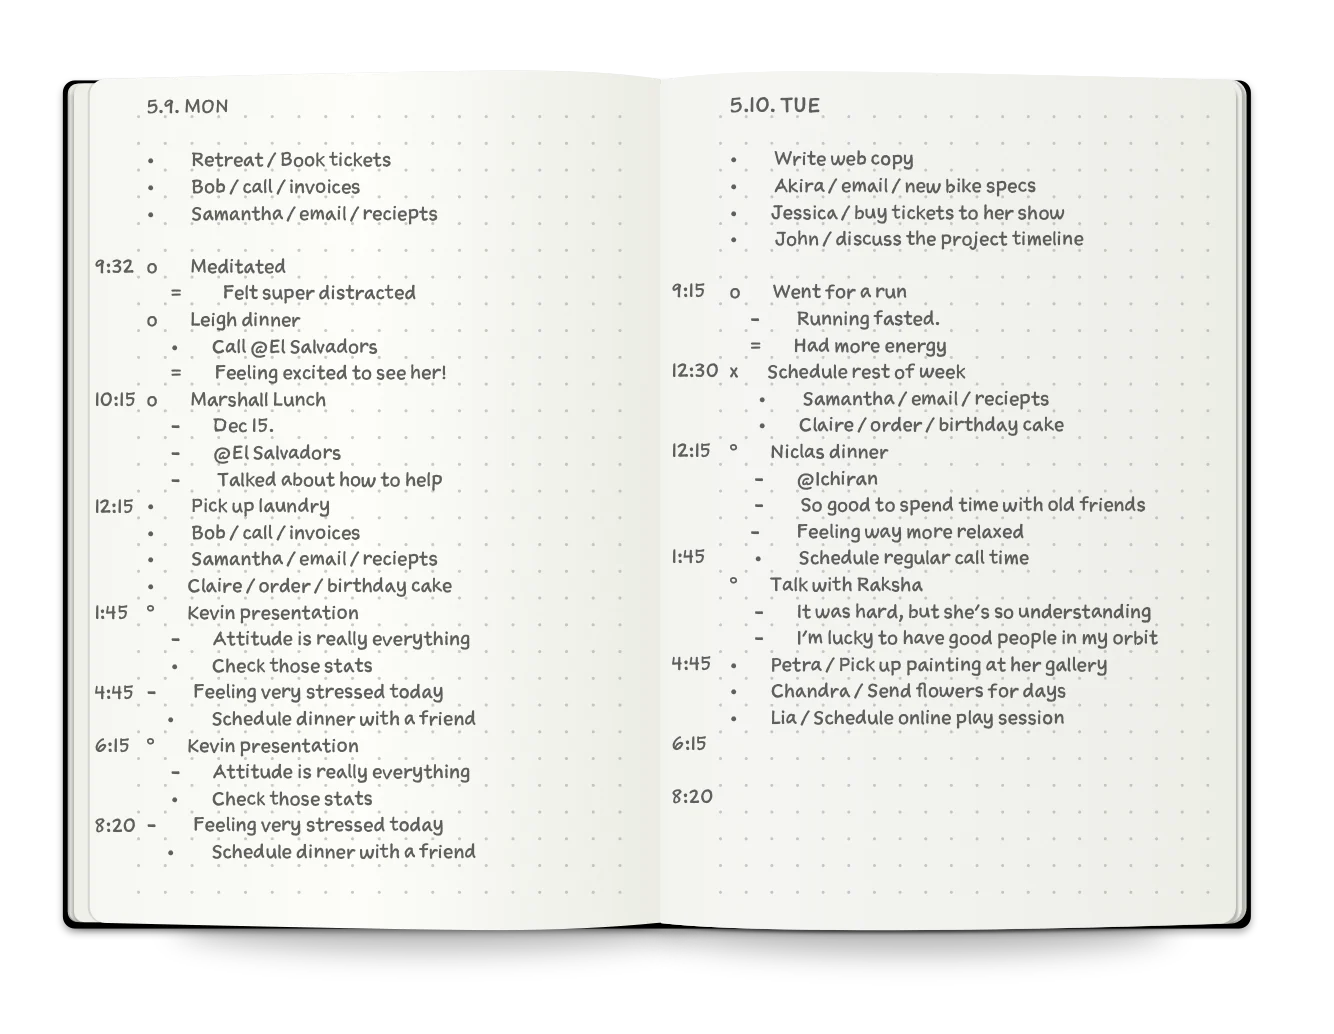
Open your planner app to today’s date. Your calendar events are already there — pulled automatically from Apple Calendar or Google Calendar. No manual entry needed.
Below your events, start rapid logging exactly like you would on paper:
- • Pick up dry cleaning
- • Email Alex re: project timeline
- ○ Team standup 10am (already on your calendar — no need to write it)
- — Idea: try the Pomodoro method for deep work blocks
At the end of the day, review. Anything unfinished gets migrated forward — either to tomorrow or to a future date. Anything irrelevant gets crossed out. This five-minute review is the heartbeat of the system. Don’t skip it.
Your Weekly View
Once a week — Sunday evening works well for most people — switch to the weekly view. You’ll see the full week ahead, with calendar events already populated. Use this view to:
- Write your top 3 priorities for the week in the margin
- Block out focus time by sketching directly around your calendar events
- Note any deadlines or milestones coming up
This is where calendar sync becomes transformative. On paper, you’d spend 15 minutes redrawing the week’s events. On iPad, they’re just there. Your energy goes into planning, not transcribing.
Your Monthly Overview
At the start of each month, open the monthly view. Again — events are already synced. Use this page for the big picture:
- Write your monthly goals at the top
- Mark key dates (birthdays, deadlines, trips) in the margins
- Add a simple habit tracker: draw a grid, label the rows, and check off each day
Habit tracking is one of the most popular bullet journal collections, and it works beautifully on iPad. You can use stickers or stamps to mark completed habits, which is faster and more satisfying than hand-drawing checkboxes.
Your Collections
This is where bullet journaling gets personal. Collections are themed pages for anything you want to track:
- Books to read
- Movies to watch
- Gift ideas for friends
- Recipes to try
- Project brainstorms
- Gratitude log
On paper, collections get scattered across your notebook and you need an index page to find them. On iPad, you can keep them organized by date or by section — and search through your handwriting if your app supports it.
Why This Setup Actually Sticks
The number one reason people abandon their bullet journal — paper or digital — is friction. Too many steps to set up. Too much time spent maintaining the system instead of using it.
The iPad setup described above eliminates the three biggest friction points:
No monthly redraw. Your calendar events appear automatically. Your daily pages are pre-structured. You just write.
No double-entry. Your real schedule and your handwritten plans live in the same view. You never have to switch between a calendar app and a planning app.
No guilt gaps. Miss a few days? No blank pages silently judging you. Just open today’s date and start fresh. The app doesn’t care about yesterday.
The Handwriting Advantage
Let’s be clear about something: the handwriting part isn’t optional. It’s not a nice-to-have. It’s the reason this works.
When you type “Finish Q2 report” into a task manager, your brain processes it as data entry. When you write “Finish Q2 report” with an Apple Pencil, your brain processes it as a commitment. The physical act of forming each letter creates a cognitive imprint that typed text simply doesn’t.
This is why the best iPad bullet journal setup isn’t a fancy task management app with sixteen integrations. It’s a digital surface that feels like paper — with just enough intelligence to keep your calendar in sync and your pages organized.
Getting Started Today
You don’t need to overthink this. Here’s your five-minute setup:
- Get the right tool. You need an iPad planner app that supports Apple Pencil handwriting and syncs with your calendar natively. Planner for iPad does both — your Apple Calendar and Google Calendar events appear directly on your daily and weekly pages, with no importing or configuration.
- Start with today. Open today’s date. Write down three things you need to do. Circle the most important one. That’s it. You’ve started.
- Add one collection. Pick something — a reading list, a gratitude log, a project brainstorm. Create a page for it. Add one entry. You now have the beginning of your personal system.
- Review at night. Before bed, spend two minutes looking at today’s page. Migrate anything unfinished. Cross out anything irrelevant. Notice what you accomplished.
- Repeat. Don’t try to build the perfect system on day one. Let it evolve. Add spreads when you need them. Skip them when you don’t. The system works because it’s yours.
The bullet journal method was never about the notebook. It was about the practice — the daily act of writing, reviewing, and deciding what matters. The iPad doesn’t change that practice. It just removes the parts that got in the way.
Your calendar is already synced. Your pages are already drawn. Your Apple Pencil is charged.
All that’s left is to start writing.
Planner for iPad is a dedicated digital planner with native Apple Calendar and Google Calendar sync, Apple Pencil support, and a planning experience inspired by Japan’s techo culture. No templates to download. No setup required. Just open and plan.